How to Edit Headshots in GIMP? (Quick and Easy Steps)

GIMP stands for Image Manipulation Program, which helps in photo revising, image composition, and image authoring. It successfully edits headshots with its free and open origin graphics editor. Image manipulation, image editing, freehand drawing, and coding are all the features it provides for thriving headshots. For a headshot to be compelling, good editing tools need to be incorporated; specialized tasks must be done with ease, making editing effortless and uncomplicated.
Headshot impacts online appearance, creating double-edged consequences. A headshot should be potent, meaningful, and persuasive, influencing observers' engagement. A good editing tool does the work by enhancing features and professionalism, making you more approachable.
So, what should be done to achieve such a striking headshot? Well, go for the gimp editing service, as it provides a powerful Photoshop capability, including layers, plug-ins, painting, text, filters, selection, and masking. In this blog, we will explore more about the steps to create outstanding headshots with gimp. So, without any further ado, let's begin with the procedure to use gimp editing services.
How to Edit Headshots in GIMP?
Gimp equips the user with tools crucial for high-quality headshot image manipulation. By only visualizing the outcome, you can retouch or restore your images into polished headshots. Follow a few simple steps and achieve excellent results. Let's begin,
Step 1: Open Your Image.
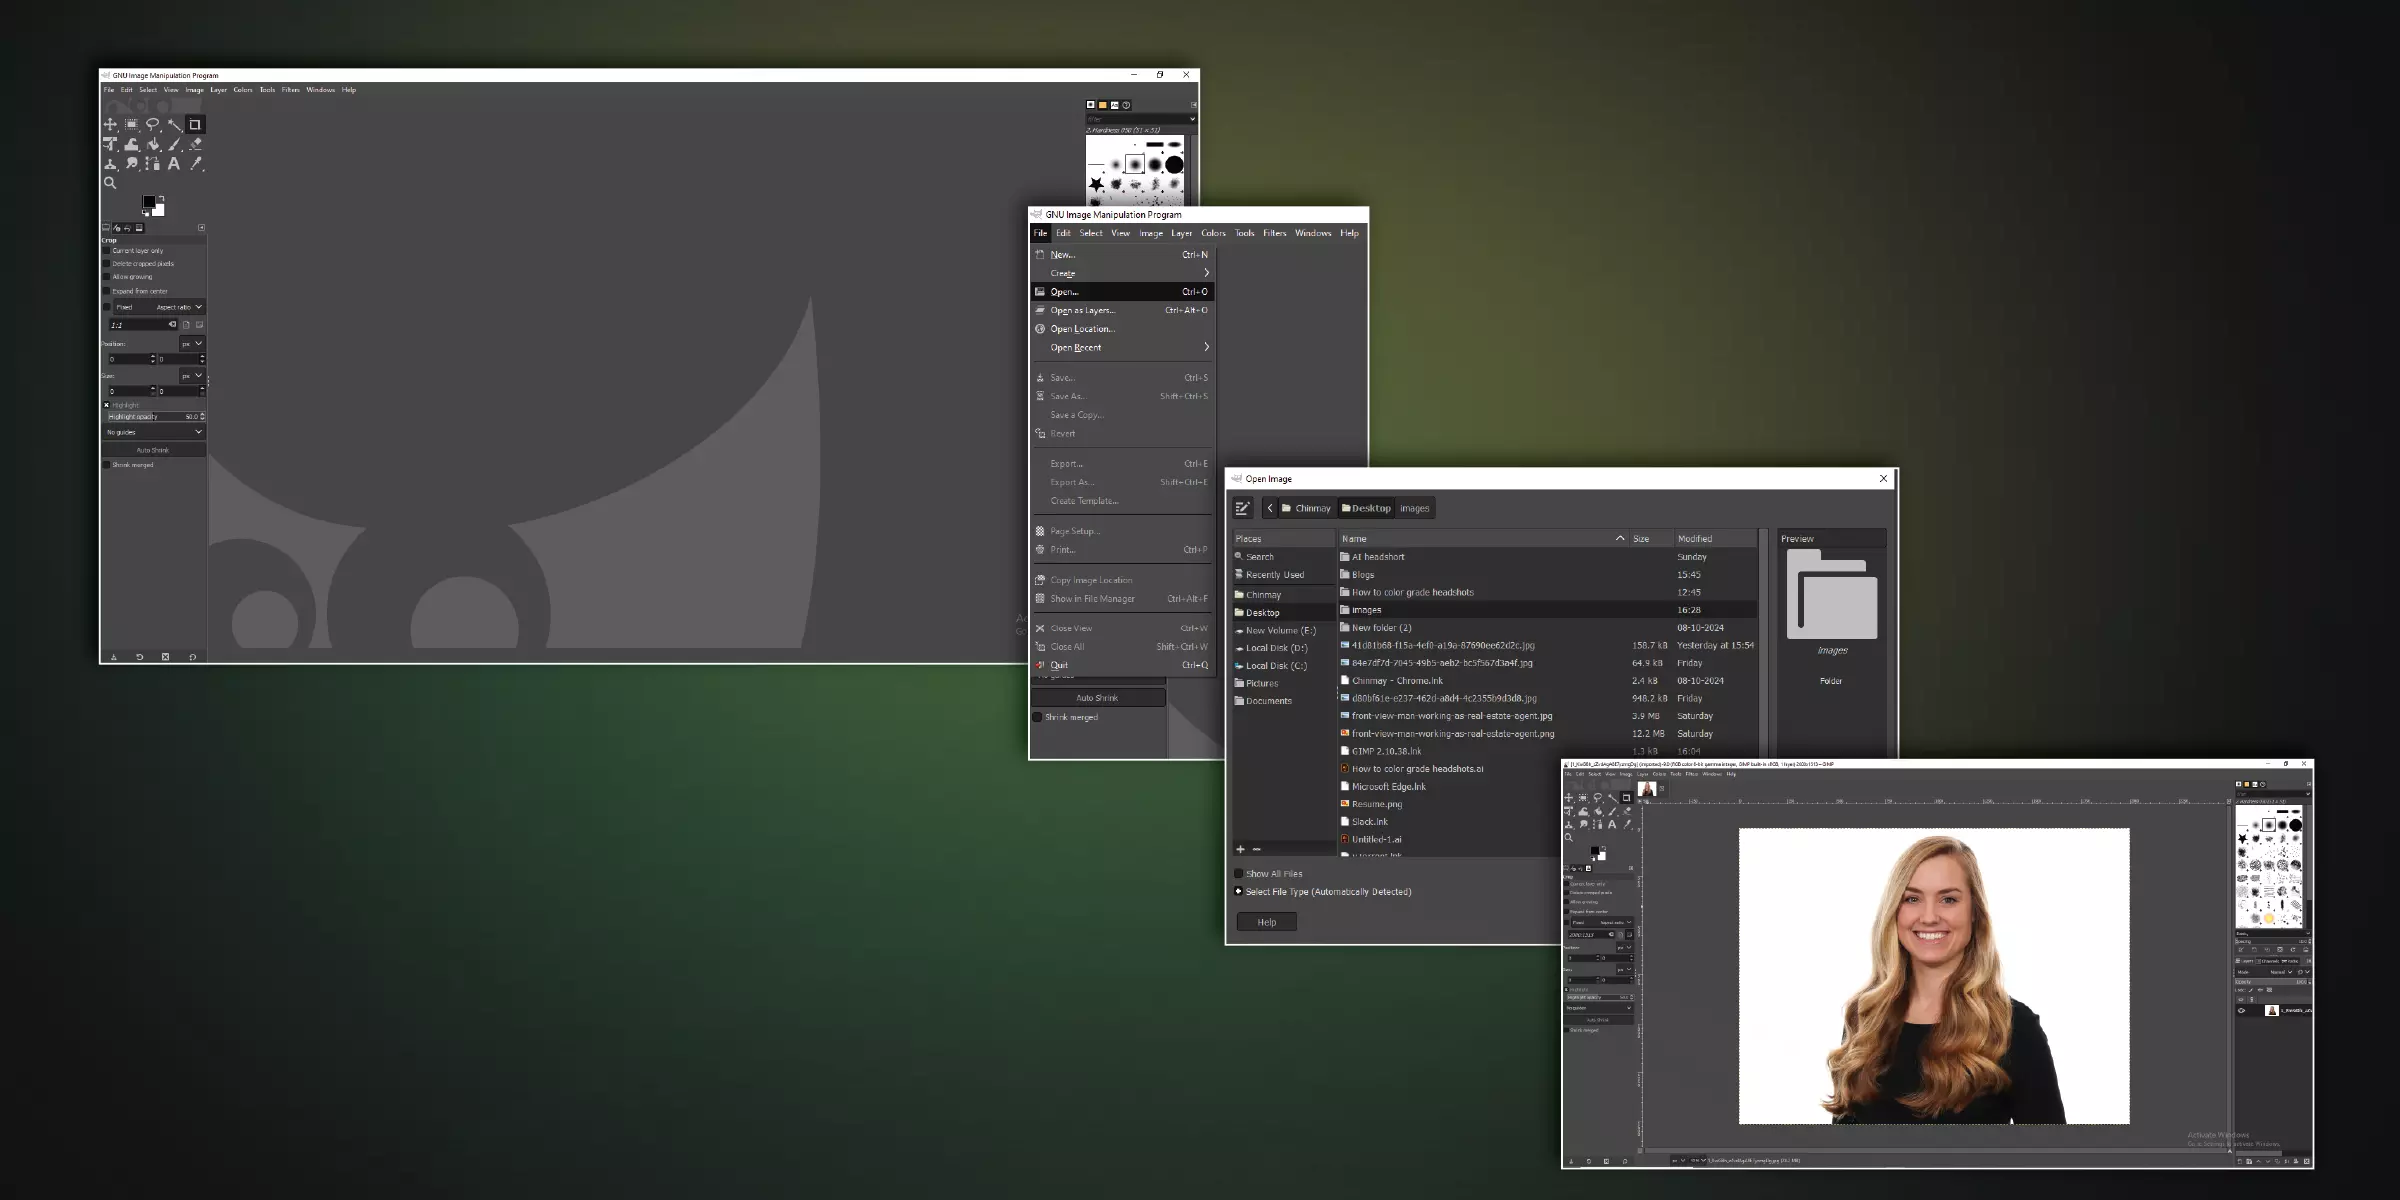
The first step is to choose the desired image you want to edit for your potent headshot. Open your image in gimp; it will run under the file type “JPEG.” A pop-up “Open Image” will appear and take the browser to the location of the image you’ve chosen. Note that if your preferred image is on any hard drive or external hard drive, you can select the section “Places” to locate your image.
Once your chosen image has been converted to a JPEG file, you can click on the ”Open” button to open the image into the gimp editing tool. It is vital to choose your image wisely as it should highlight your facial features prominently, all while portraying professionalism and a trustworthy appearance.
Step 2: Adjust the Levels.
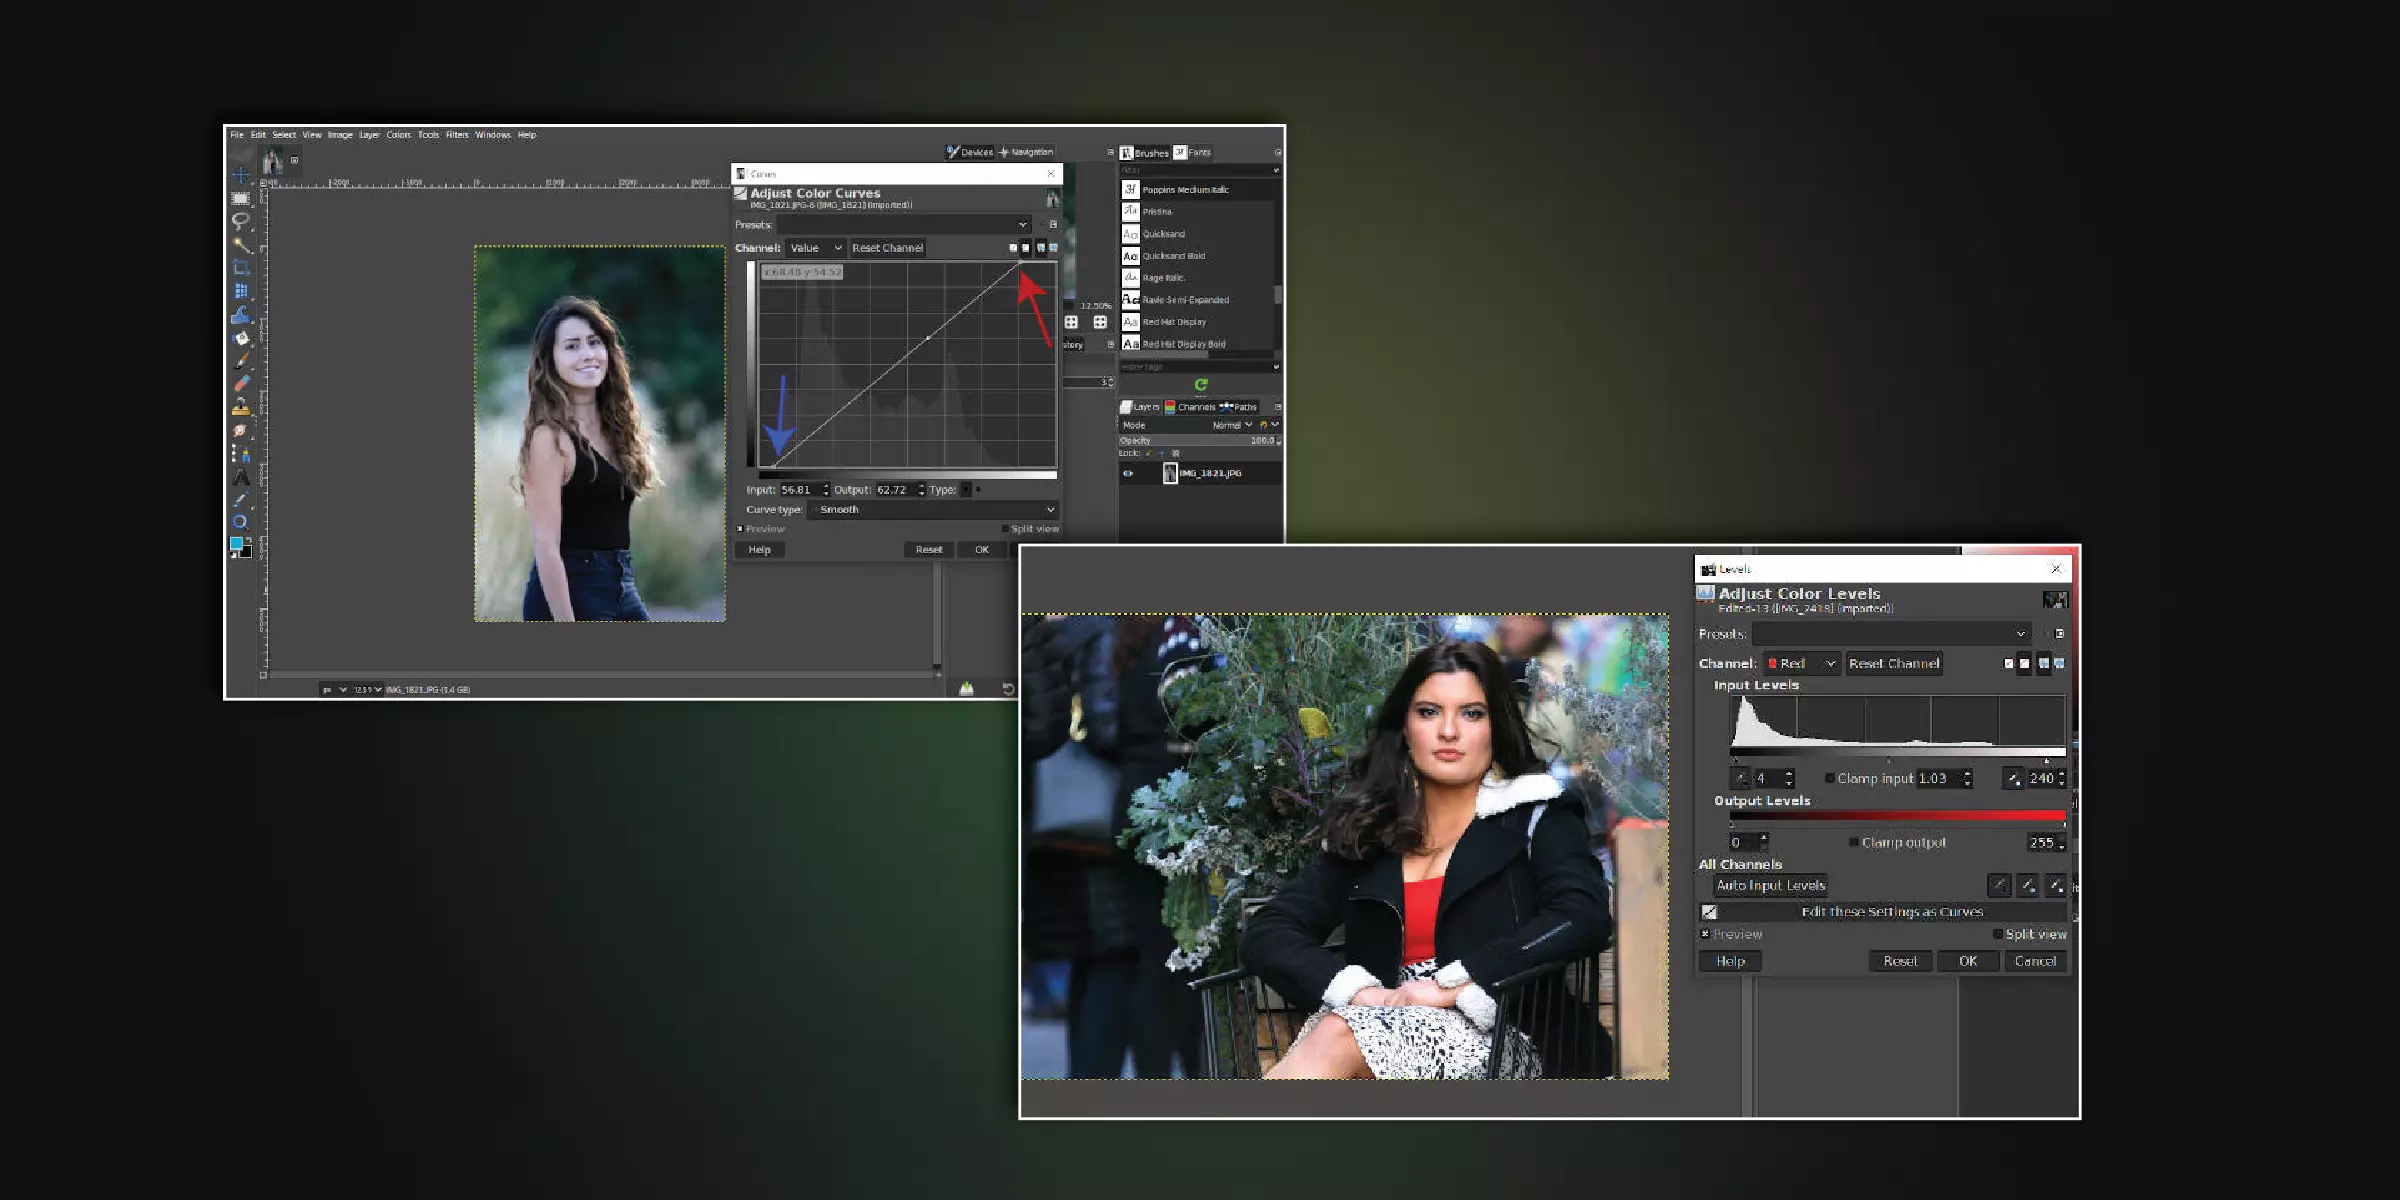
The second step is the level adjustment tool. Before editing, duplicate your image, as it saves your actual image and a separate image for editing by clicking on the ”Duplicate” icon. With the Colors>Levels arrow, you will see a dialogue labeled “Adjust Color Levels.” Beginning with the “Value” channel edit, you can adjust both the brightness and contrast of your image and the colors of your image. Any shadows, highlights, or mid-tones can be adjusted by shifting the Black point on your image.
The “Red” channel adds red to the mid-tones by shifting the mid-tone slider to the left, all by adding contrast to the selected headshot image. Just like the “red” channel, there are” green” and “blue” channel buttons, which help highlight and contrast images by increasing the green and blue elements of the image. Making adequate changes in the pixels helps highlight the headshot image more precisely.
Step 3: Adjust Shadows-Highlights.
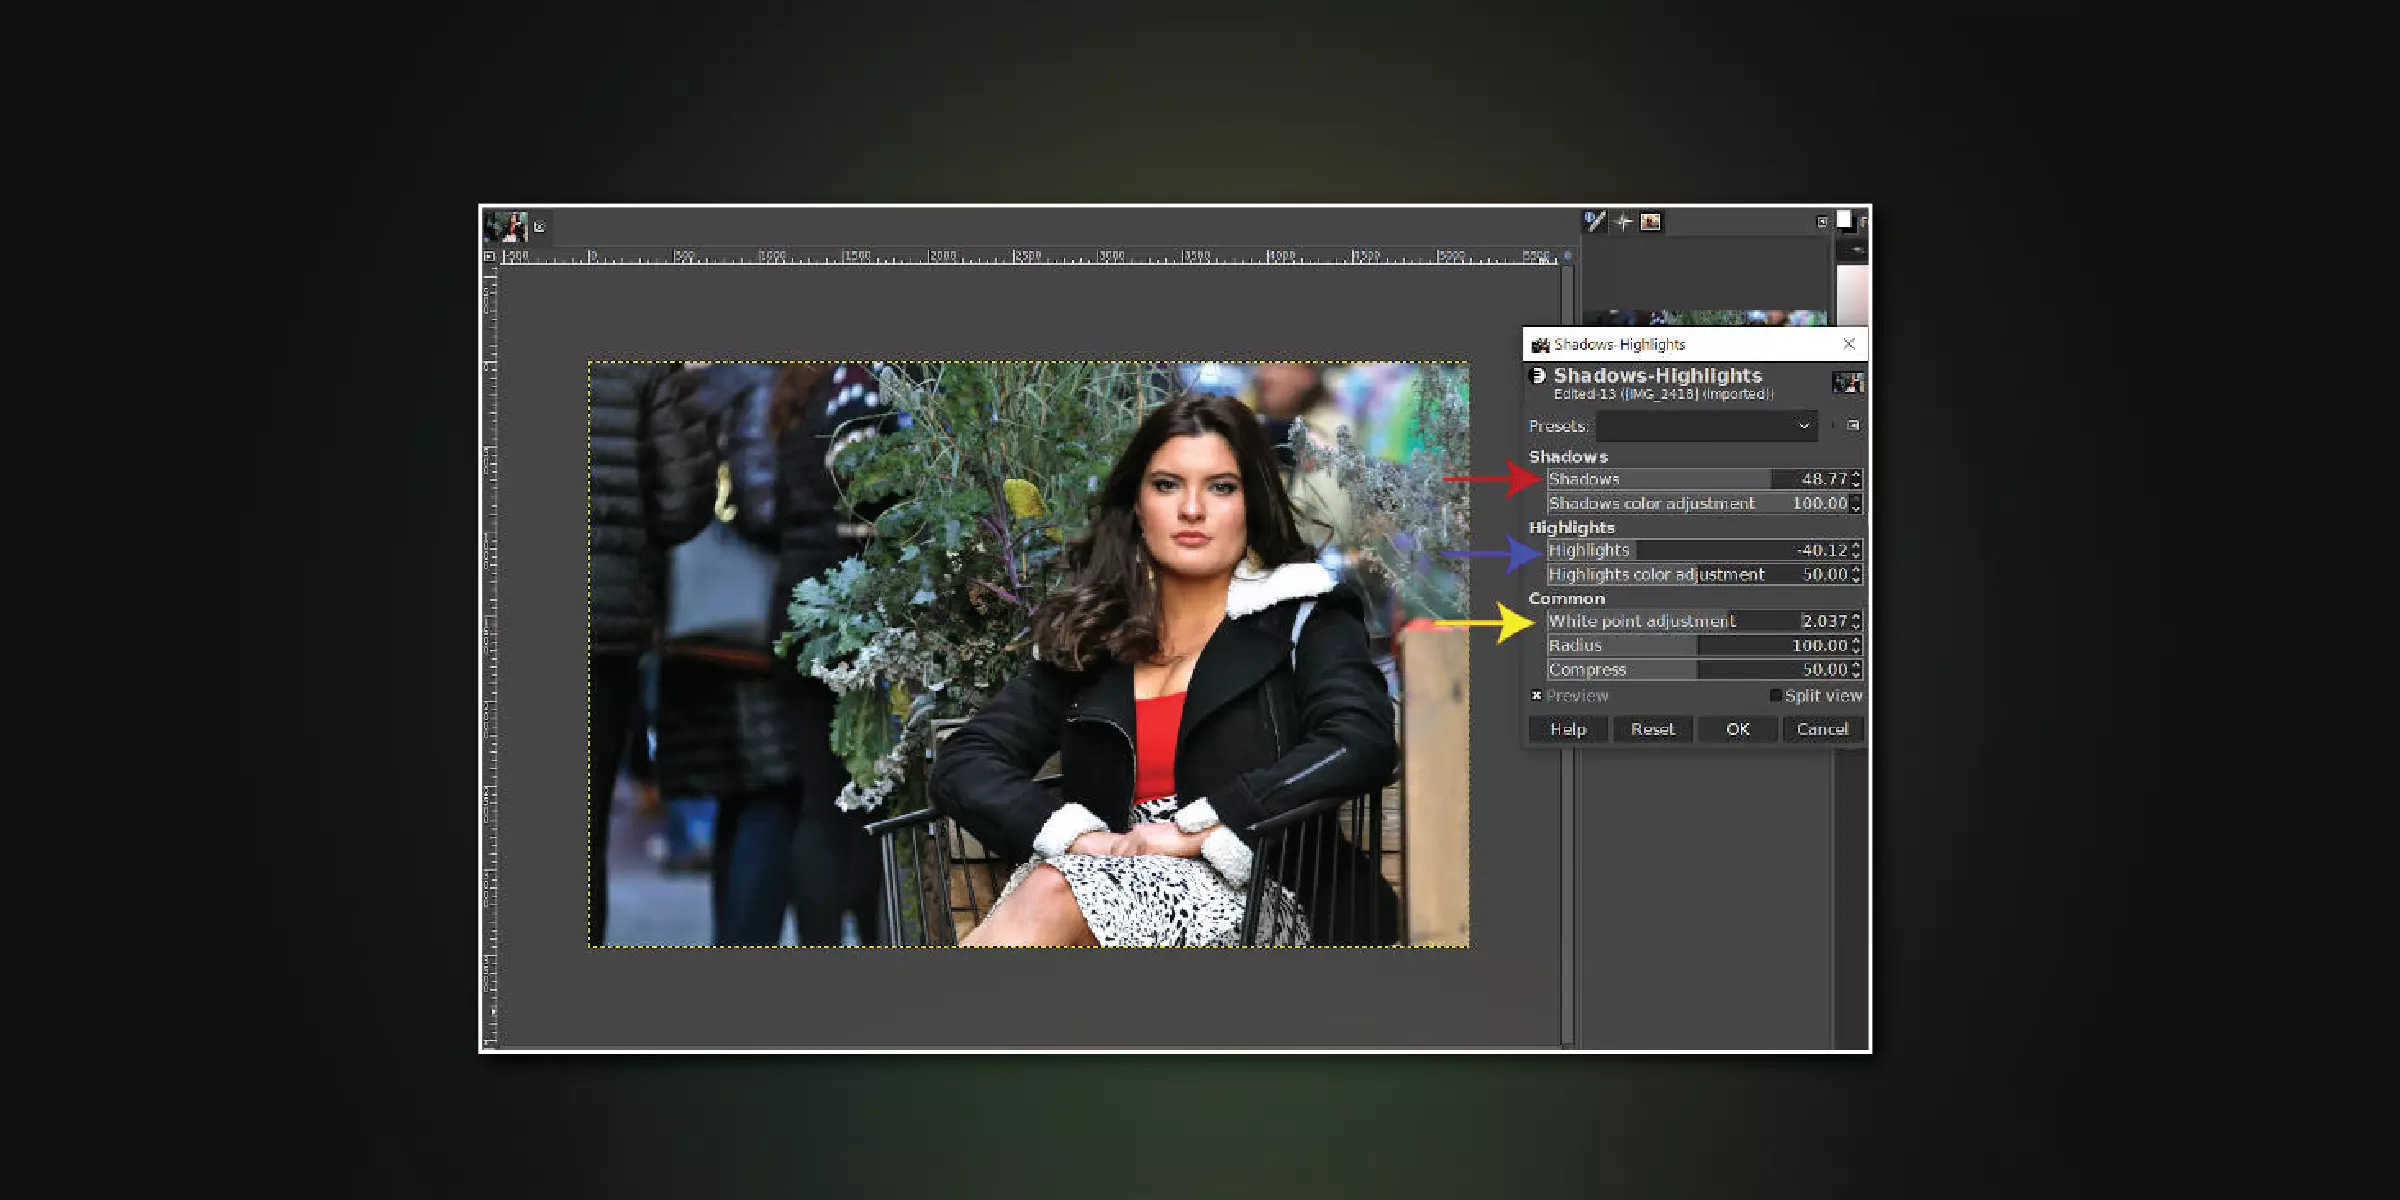
The next step is the Shadows-Highlights tool. By choosing Colors>Shadows-Highlights, you can create equilibrium in your photo by adjusting the exposure of your shadows and highlights with minimal effect on the mid-tones of the image. Usually, increasing the exposure value of the Shadows and decreasing the value of highlights creates an excellent piece of art.
The next step is to shift the white point by dragging the “shift white point” slider either left or right. By shifting to the left, the image becomes darker, and by shifting to the right, the outcome becomes brighter. Applying this step in your headshot editing creates a favorable impact by enhancing and creating depth in the image. Once you are satisfied with editing, you can click OK to apply my changes.
Step 4: Adjust Saturation.
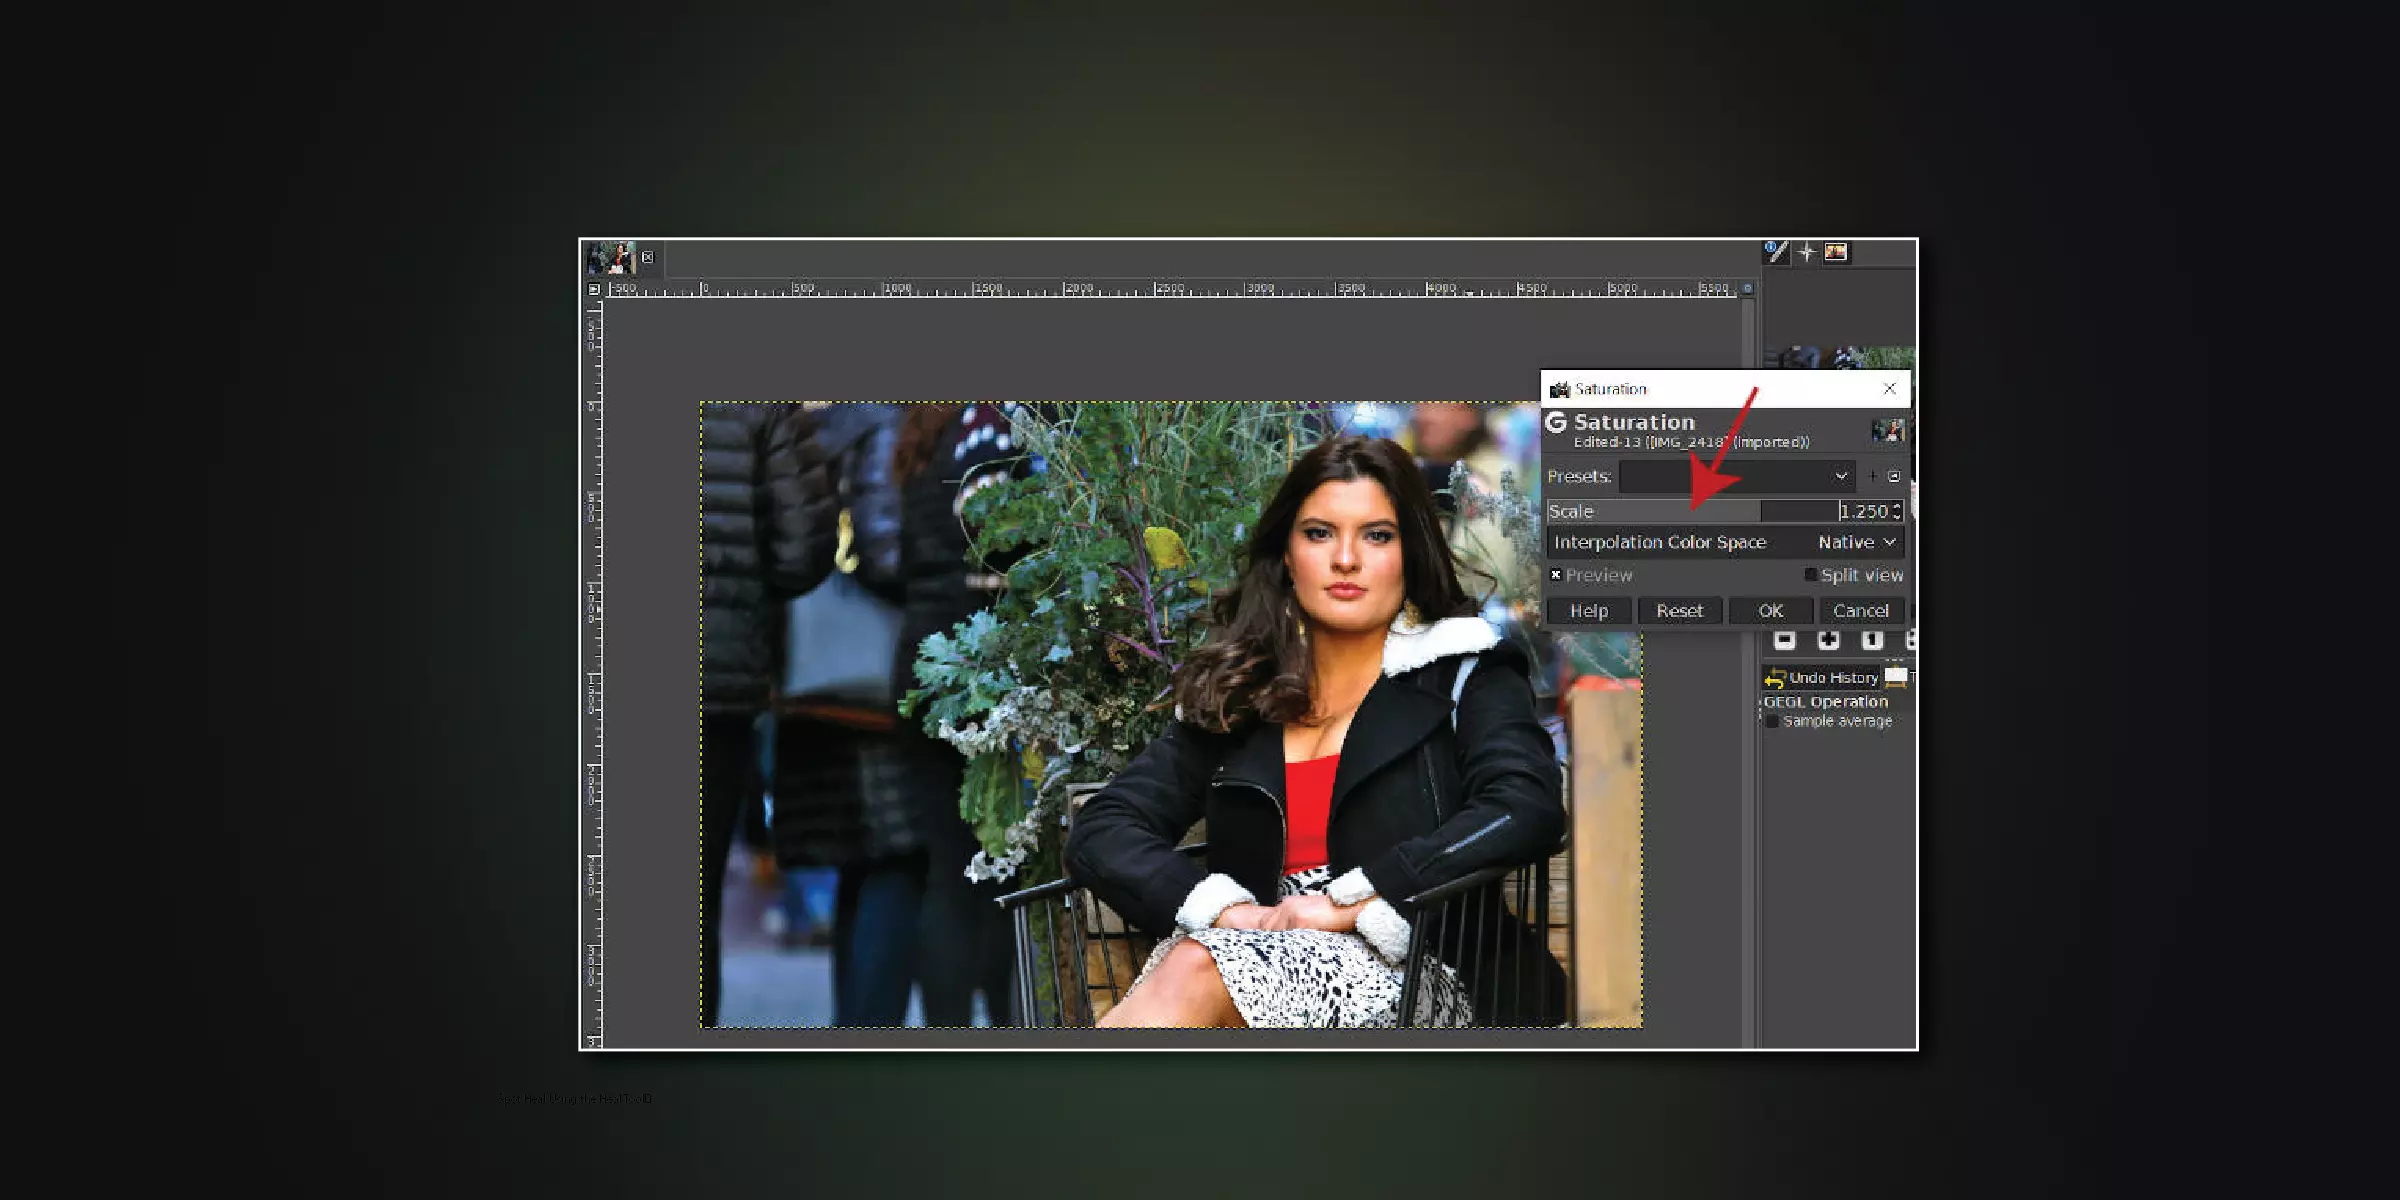
For a headshot to stand out, it is essential to make necessary adjustments in its saturation. Saturation is the intensity of colors, so adding saturation increases the intensity of the colors in your photo, while removing saturation decreases the color intensity. To adjust the saturation of a photo in gimp, go to Colors>Saturation, where you can increase or decrease the scale of saturation by dragging the slider to the right and left.
Saturation editing plays an important role in highlighting skin tones and clothing, creating a more vibrant and distinct headshot. It helps convey positivity and energy, making the whole headshot inviting. Revising saturation helps maintain a cohesive headshot look for professional portfolios. It allows for creative expression, giving the headshot a unique identity.
Step 5: Spot Heal Using the Heal Tool
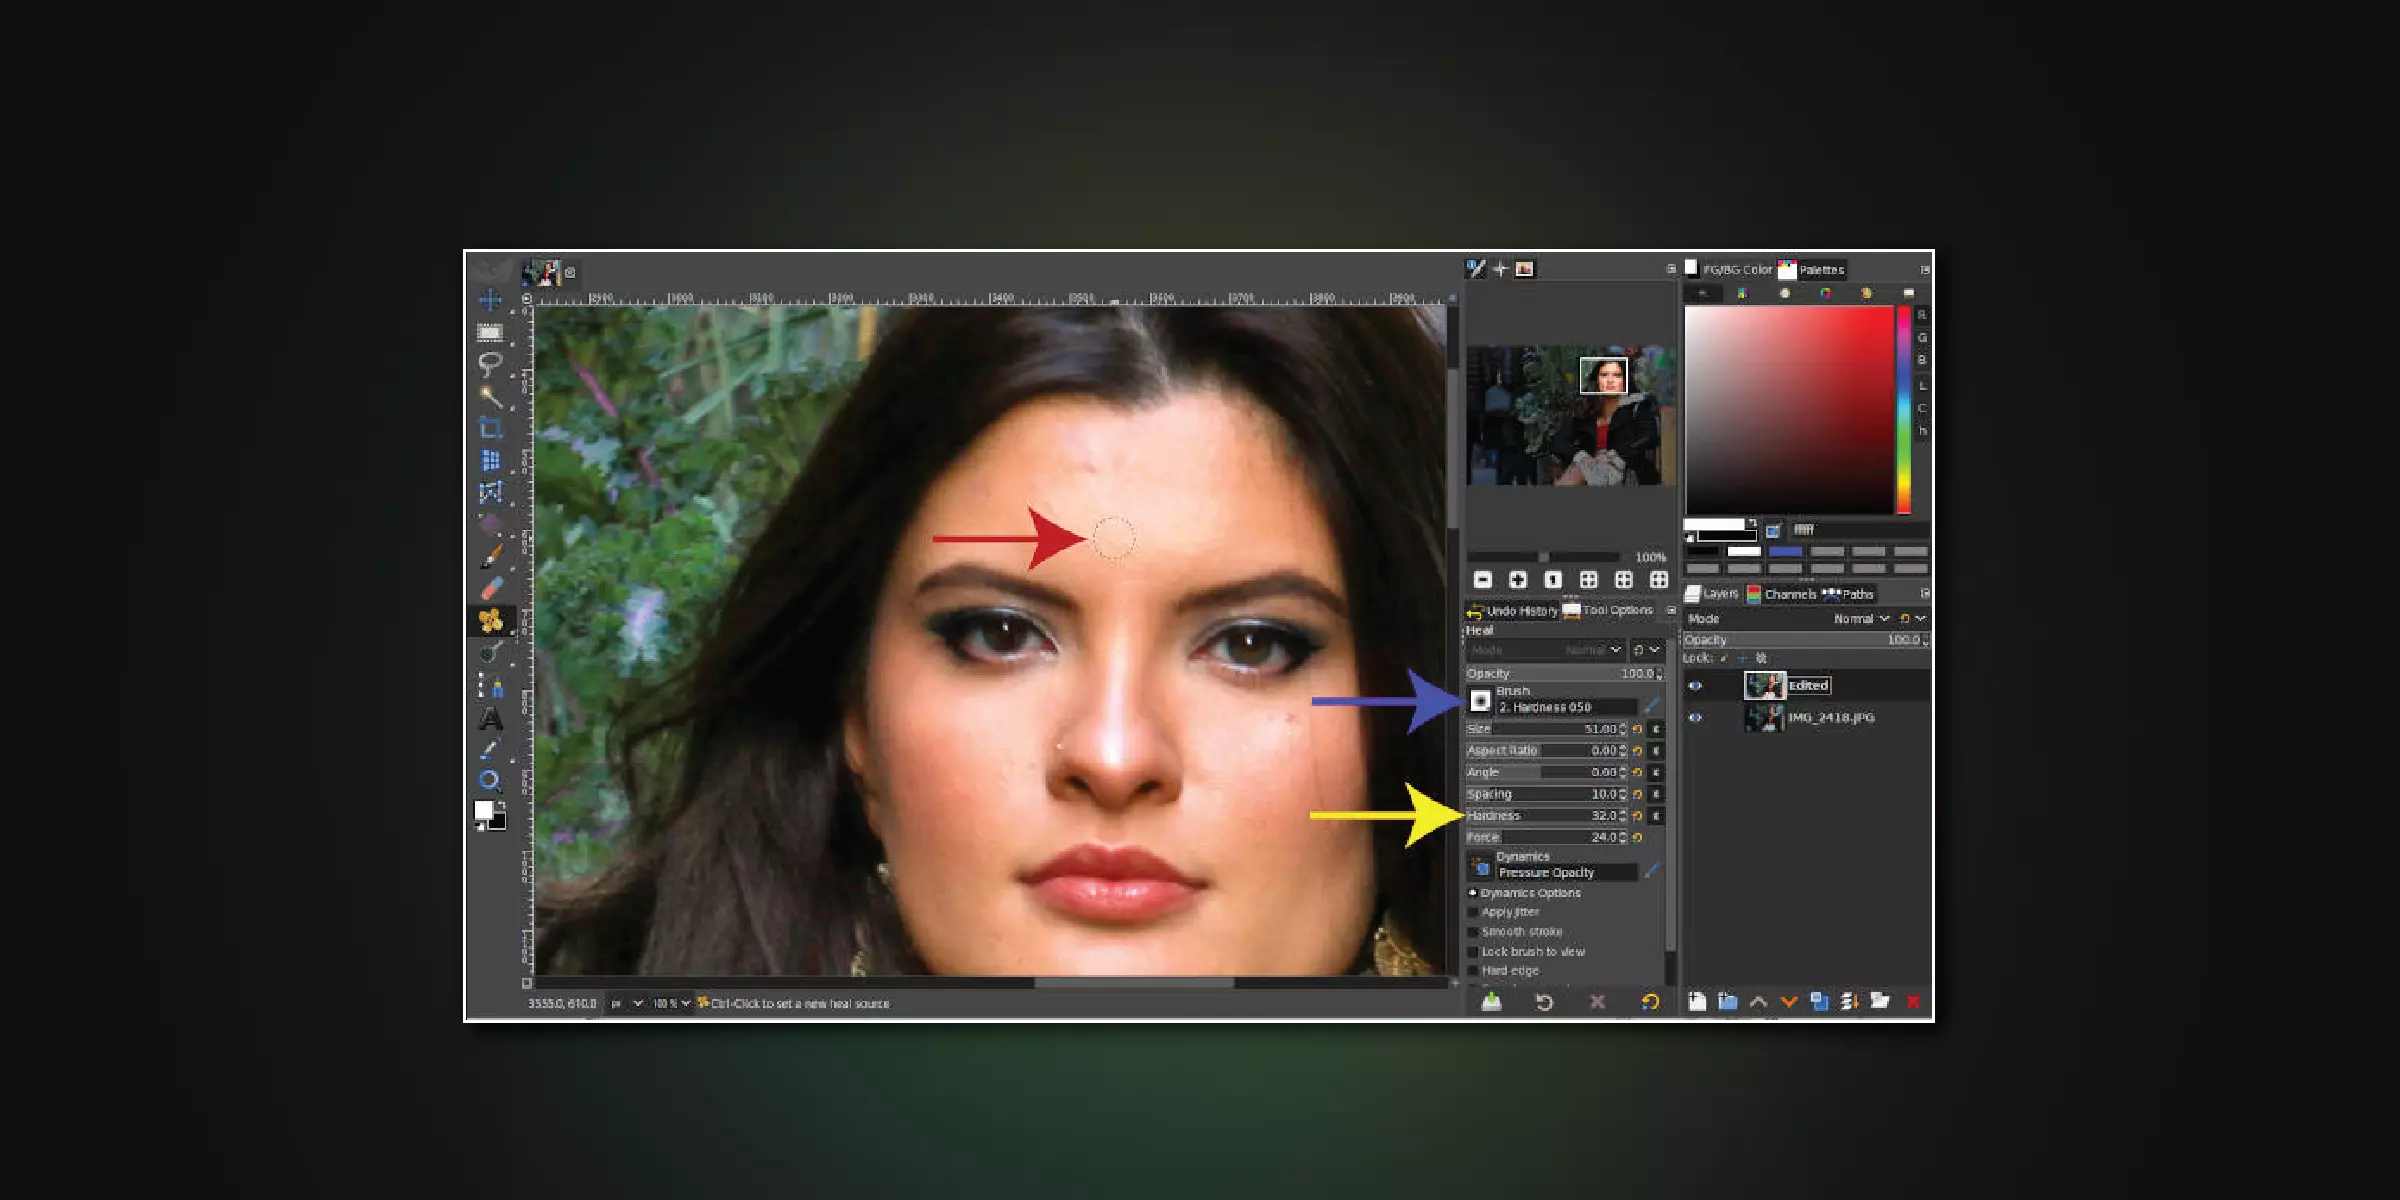
The “spot healing” tool allows you to fix small problem areas like acne, scarring, and wrinkles. Incorporating this step in your headshot creation helps in creating a glossy and polished outcome. Simply by hitting an H key on your keyboard or clicking on the “clone tool” in the toolbox, the area you want to blur out can be easily done. It is also known as a “paint tool” as it helps in brushing all the defective areas.
Creating a spotless headshot has always been our motive. The use of the heal tool helps in creating a glossy creation by blending any acne marks or wrinkles, which shifts focus from the face towards it creating a negative impact on your headshot. Thus, the use of the heal tool in gimp helps in achieving a professional and friendly headshot.
Step 6: Sharpen Your Image.
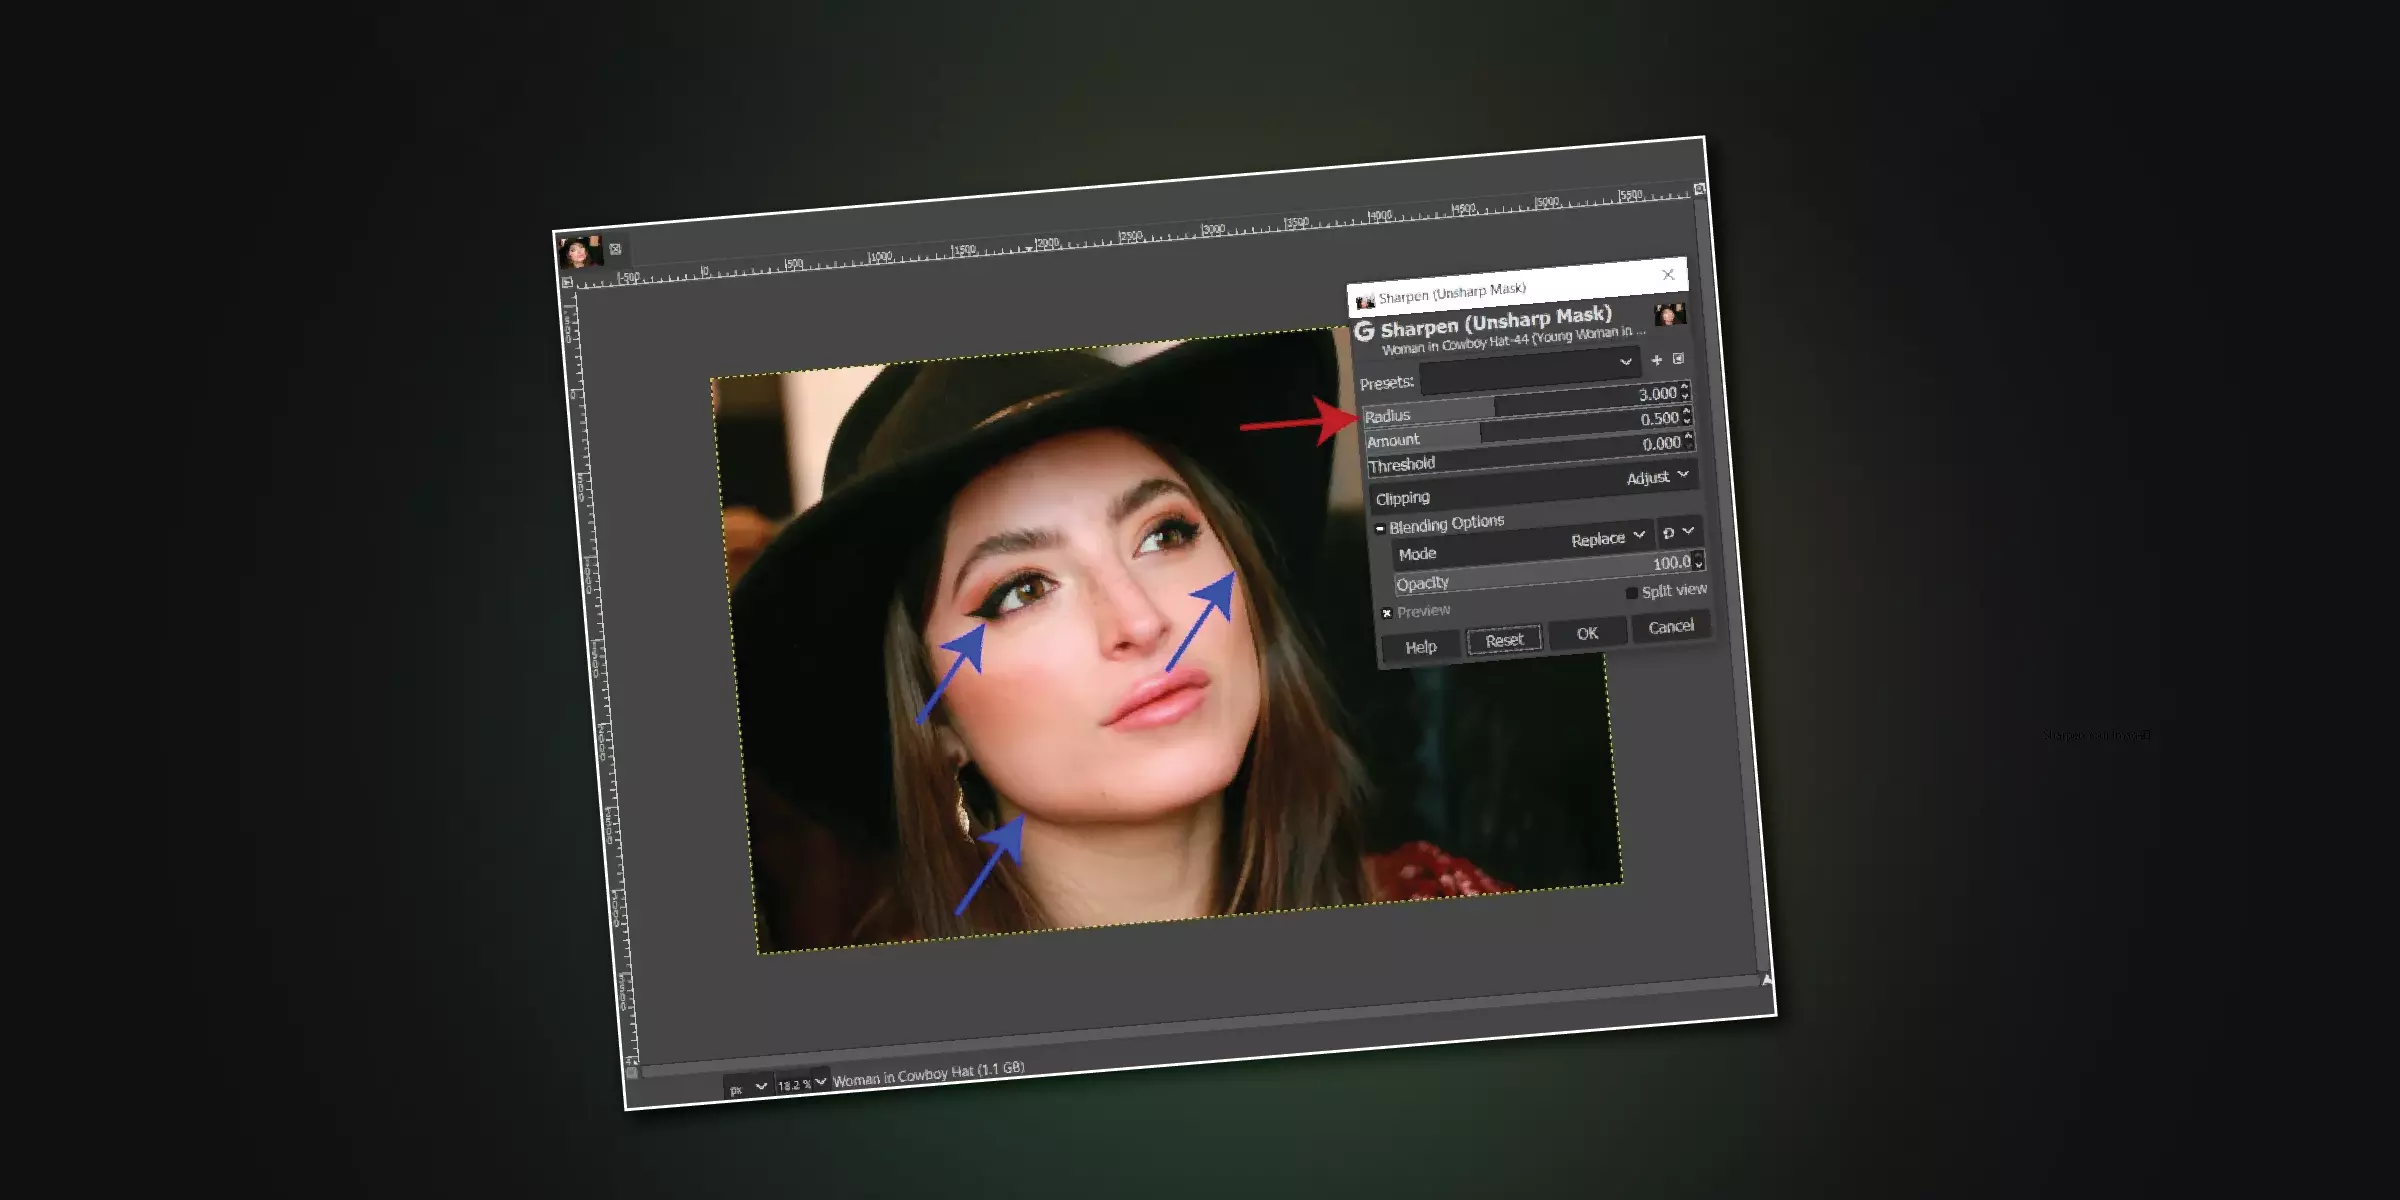
The easiest app to sharpen your image for a headshot is the use of the gimp editing tool, as it is uncomplicated with quick results. Go to Filters>Enhance>Sharpen tool. There are three sliders here – Radius, Amount, and Threshold cursor. The radius cursor helps control the size and “edge” of the area for sharpening. The Amount cursor helps to intensify the quantity of strong sharpening and the Threshold cursor allows to determine the detail for “edge” sharpening.
The preferred image should be a high-definition image before scaling or sizing of image. The quality of the image matters as it impacts the potential to sharpen the image. The sharpening editing tool helps blur out acne or wrinkles from the image, making it polished and glossed for an approachable online appearance.
Step 7: Crop Your Image.
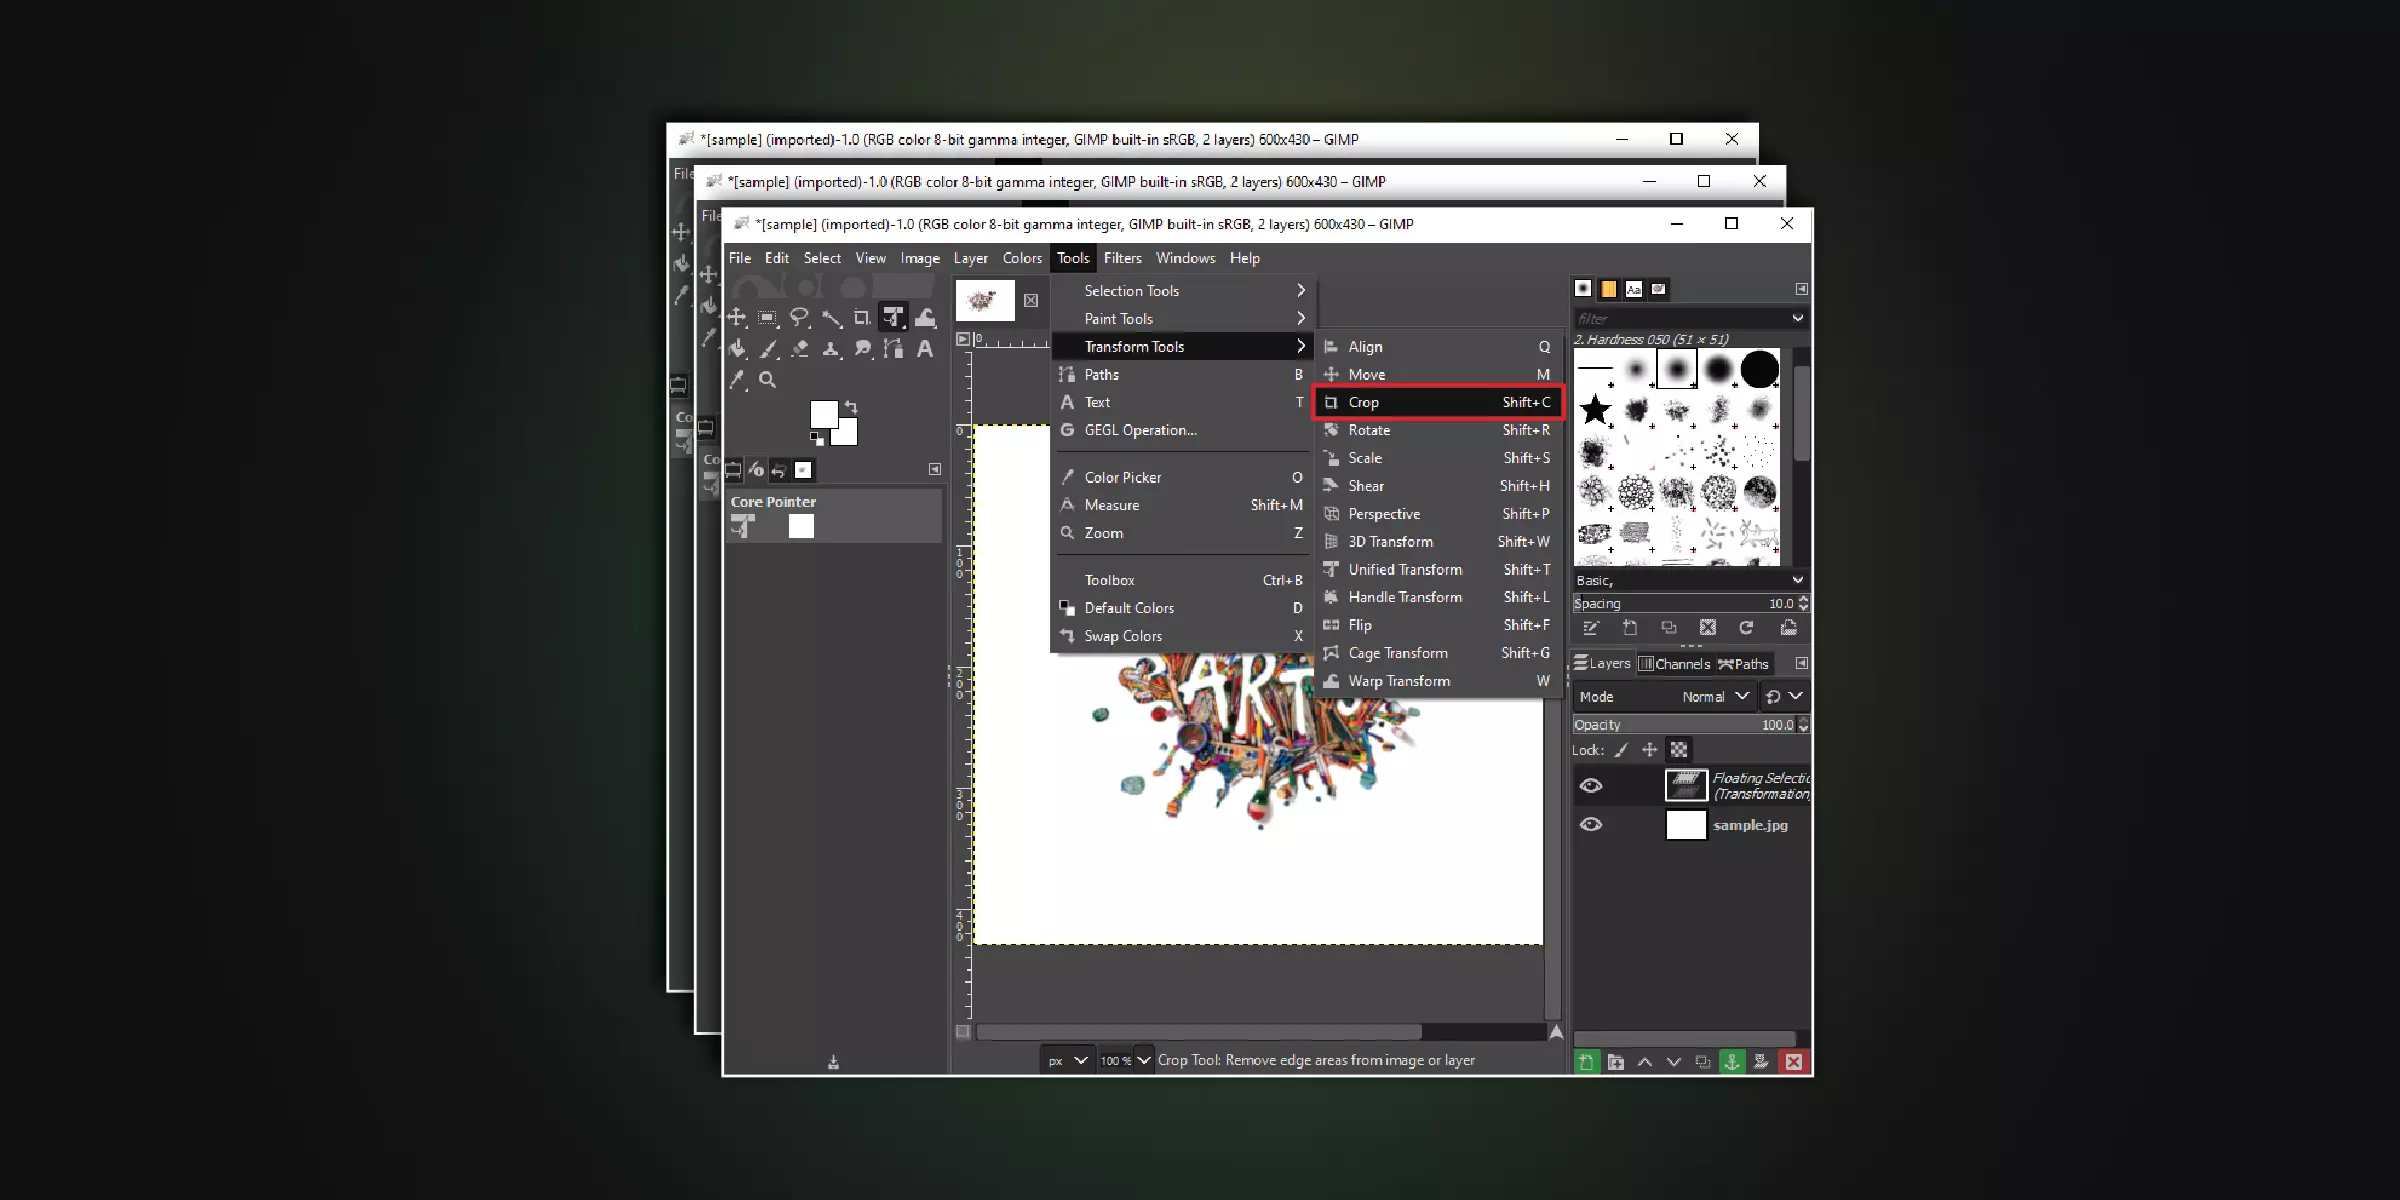
For a refined headshot, any unwanted/clustered background needs to be cropped out to create a polished look. To accomplish this, a “Crop tool” is available in the gimp editing app, which makes it convenient to crop out unwanted areas. Simply use the ”Shift + C” key to select the area you want to keep. Adjust the edges and press “Enter”.
You can also crop your desired headshot with a certain aspect ratio Cursor. Through this a fixed proportion of area is cropped out by adding in ratios. You can pull the crop area until it reaches the limitation of the image, also, you can continue cropping the image by entitling the “Allow growing” option. Cropping your image is essential as it helps highlight the desired area without crediting any distraction.
Step 8: Add a Vignette.
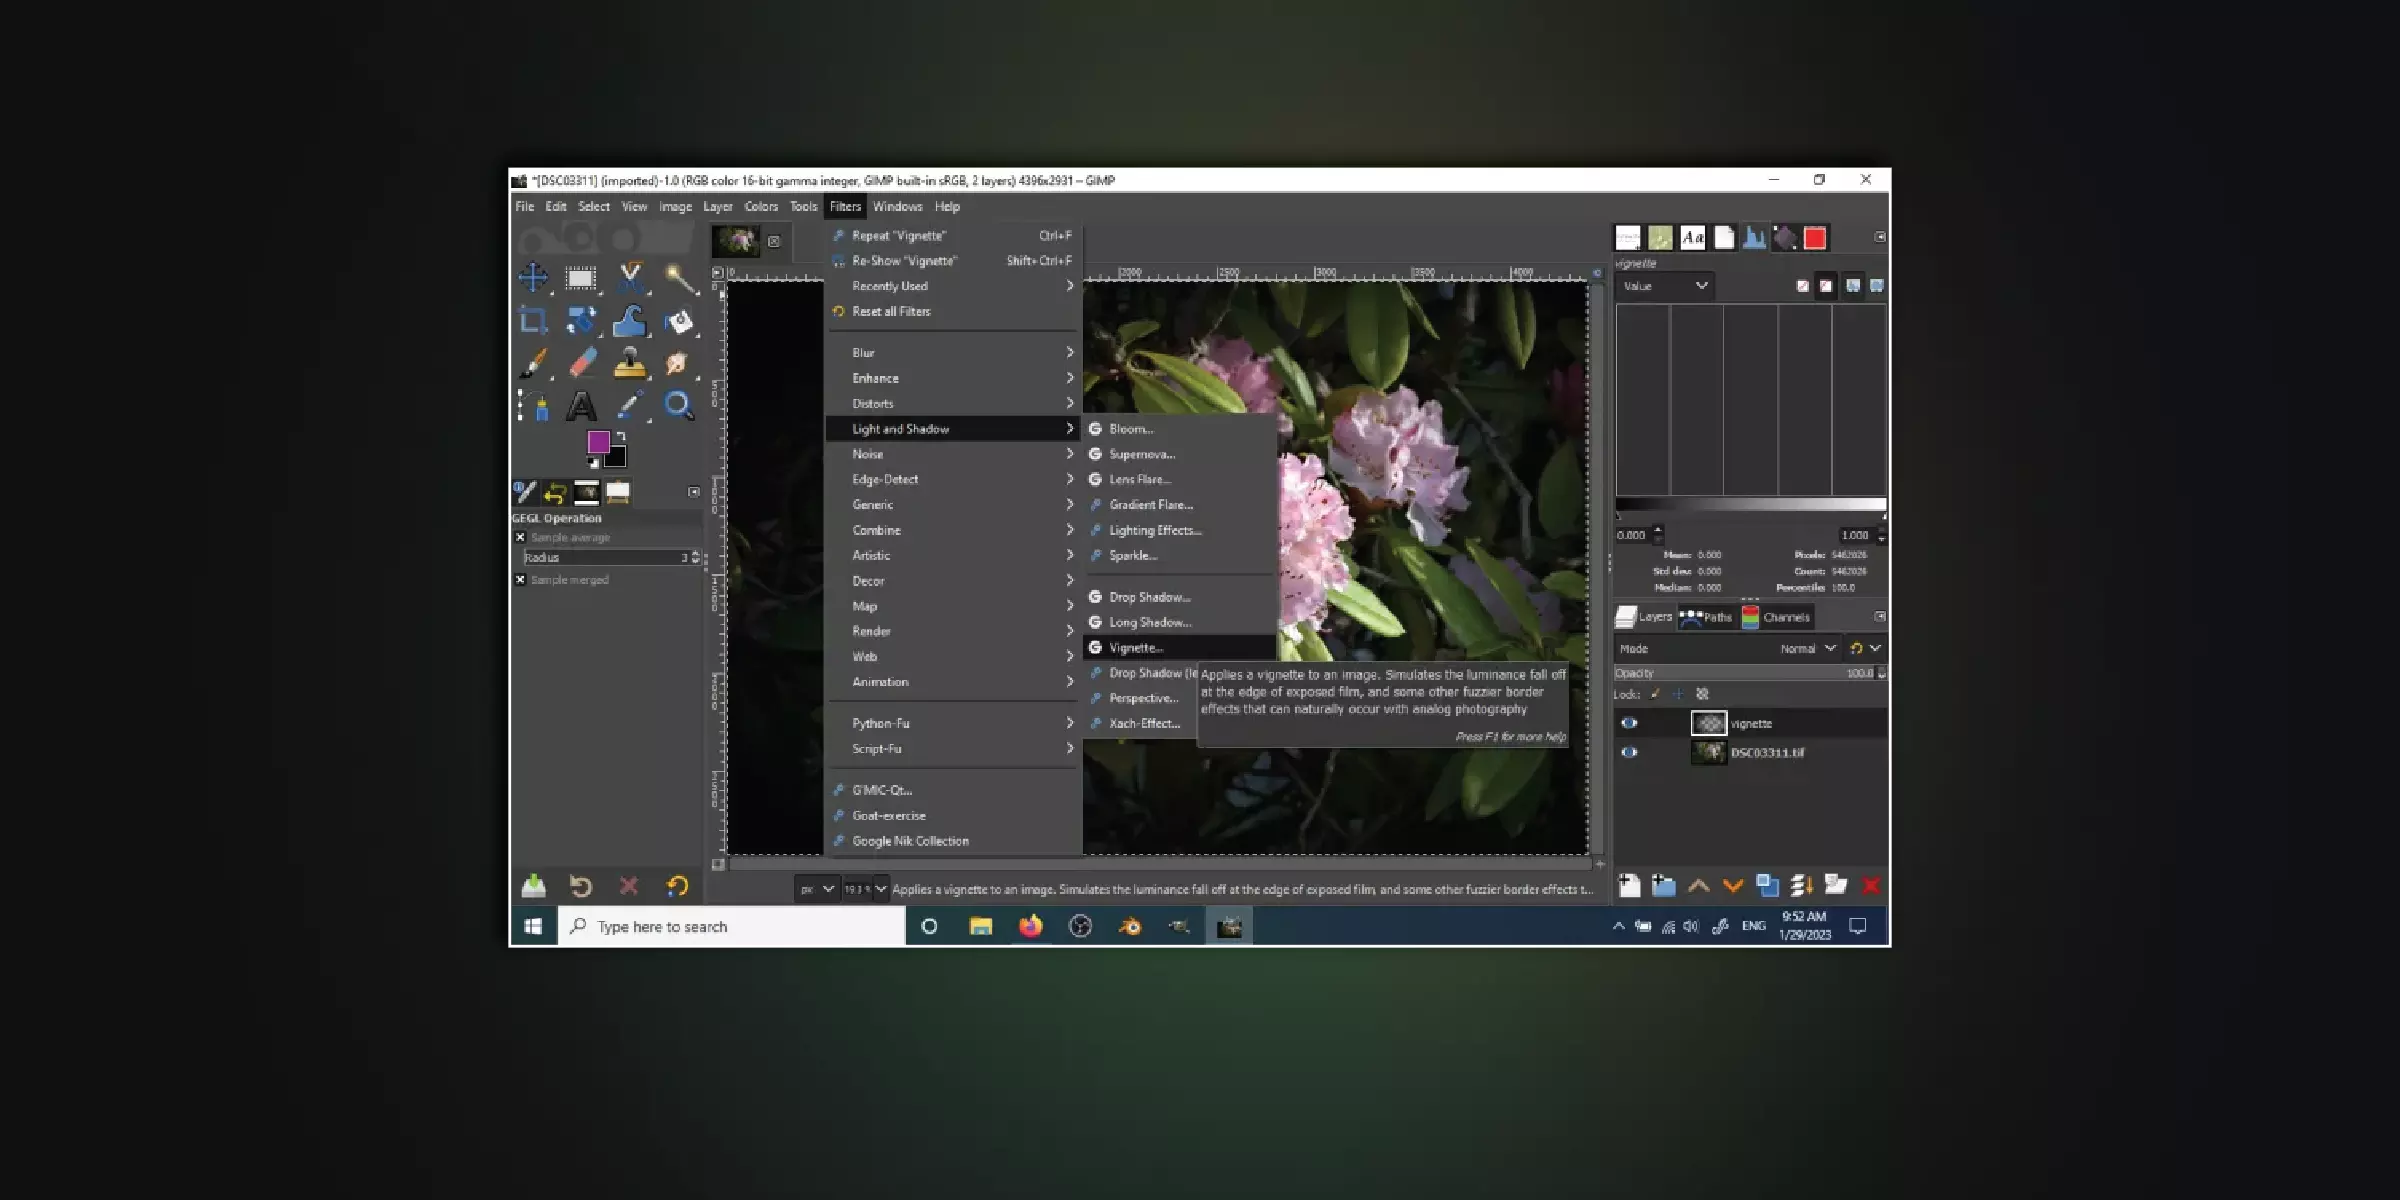
The use of a vignette enhances your image into a professional and credible headshot. It is a crucial editing process to intensify your impression over the viewer. By selecting the “Vignette” tool, you can add a layer to your existing image, making it manageable. Go to Filters>Light and Shadow>Vignette; this will bring up the Vignette dialogue box. Under the vignette tool comes the Radius, Proportion, and Softness slider.
The radius slider helps you to increase or decrease the size of the image, whereas a softness slider determines how soft the edges of the image will be. The Proportion slider allows you to set the aspect ratio of the vignette relative to the balance of your image. A successful implementation of a vignette tool helps create a darkening or lightening of the edge, creating an overpowered headshot.
How to Achieve the Perfect Headshot Without GIMP
Looking to take the perfect headshot? Check out AIHeadshotGenerator.media, an online tool that can transform your image into a headshot. With AIHeadshotGenerator.media, anyone can easily turn their image into a professional headshot. Sounds confusing? Let's walk through the steps to transform your selfies into headshots.
Step 1. Browse AIHeadshotGenerator.media and click on “Create Your Headshot.”
Step 2. Go to the upload images button and select your front-facing selfies. Ensure you select at least eight selfies for better results.
Step 3. After 60 minutes, you will receive an email notification, front here, you can smoothly download your headshots. Transforming images into headshots with AIHeasshotGenerator.media is as easy as pie!
Conclusion
In short, revising headshots in GIMP permits for proficient and glossed results with a spectrum of tools, making editing effortless and speedy. The overall quality and appearance of the headshot are enhanced by concentrating on cropping, color adjustments, retouching, and sharpening of the image. By following proper steps and practising routinely, you can create impressive headshots that represent yourself virtually. May it be for personal branding or professional use, GIMP provides the flexibility to achieve the desired look.
FAQ's
By using the "Colors" menu and "Brightness-Contrast" option, you can make adjustments in the lighting of your image. By moving the brightness slider to the right, you can increase brightness and by sliding to the left, you can decrease it.
It helps remove blemishes and imperfections by blurring out any acne marks, wrinkles, and scars. It is a crucial tool as blurring out this imperfection helps in keeping focus on the face and avoids distraction.
GIMP offers a powerful editing tool, customizable interface, multi-platform compatibility, layer support, and it is free and open source, which makes it the best editing tool for headshots.
Use the "Fuzzy Select" or "Select by Color" tools to select the background. This tool helps to delete or replace the background with another layer.
Go to the "Filters" menu, select "Enhance," and then "Sharpen”. You can adjust the sharpness level of your image according to your preference.


